Tattoo Drawings lets you take an idea through three stages: create a design, preview its placement on a body, and turn the artwork into an editable stencil. This guide explains how to use Tattoo Drawings from your first prompt to a file you can share with your artist or prepare for transfer printing.
- Create your design. Describe your idea in AI Tattoo Generator, choose a style, and select Generate Tattoo. You can also upload artwork you already have.
- Try it on. Choose a model or upload your photo, move and resize the tattoo, then download a mockup or blend it with the skin.
- Prepare a transfer stencil. Select Create Tattoo Stencil, refine the lines, set the physical width, and download a PDF, PNG, or editable SVG.
Open the Tattoo Drawings studio to follow along. The numbered markers in each screenshot match the notes immediately below it. Open any screenshot to see the controls at full size.
Before you start
Have a short description of your idea, or a tattoo image in PNG, JPEG, or WebP format. For a personal try-on, choose a clear, well-lit photo with the intended skin area visible. A built-in model works if you only want to explore placement. If you plan to print a stencil, decide its approximate width in millimeters; you can change it in the print settings.
Your current draft is saved automatically in this browser. Download the files you want to keep, especially before switching devices or clearing browser data. For current generation allowances and credit options, check the pricing page.
1. Generate a tattoo design
- Describe the design. In AI Tattoo Generator, enter the subject, line style, colors, and composition you want. Describe the tattoo artwork itself. Mentioning a body area can communicate the intended use, but the design result is separate from the try-on photo.
- Choose a style. Use Style to choose a direction such as Fine line, Blackwork, or Ornamental. Choose for me leaves the direction open. Add a reference image if you want to communicate a particular shape or mood.
- Create and review. Select Generate Tattoo and wait for the result. Inspect small details and any lettering. If you want a different version, revise the description or style and select Generate Another.
For example, you could start with this prompt:
An ornamental butterfly with symmetrical wings, delicate black outlines, flowing decorative curls, and a few small dots. Keep the complete design on a plain white background.
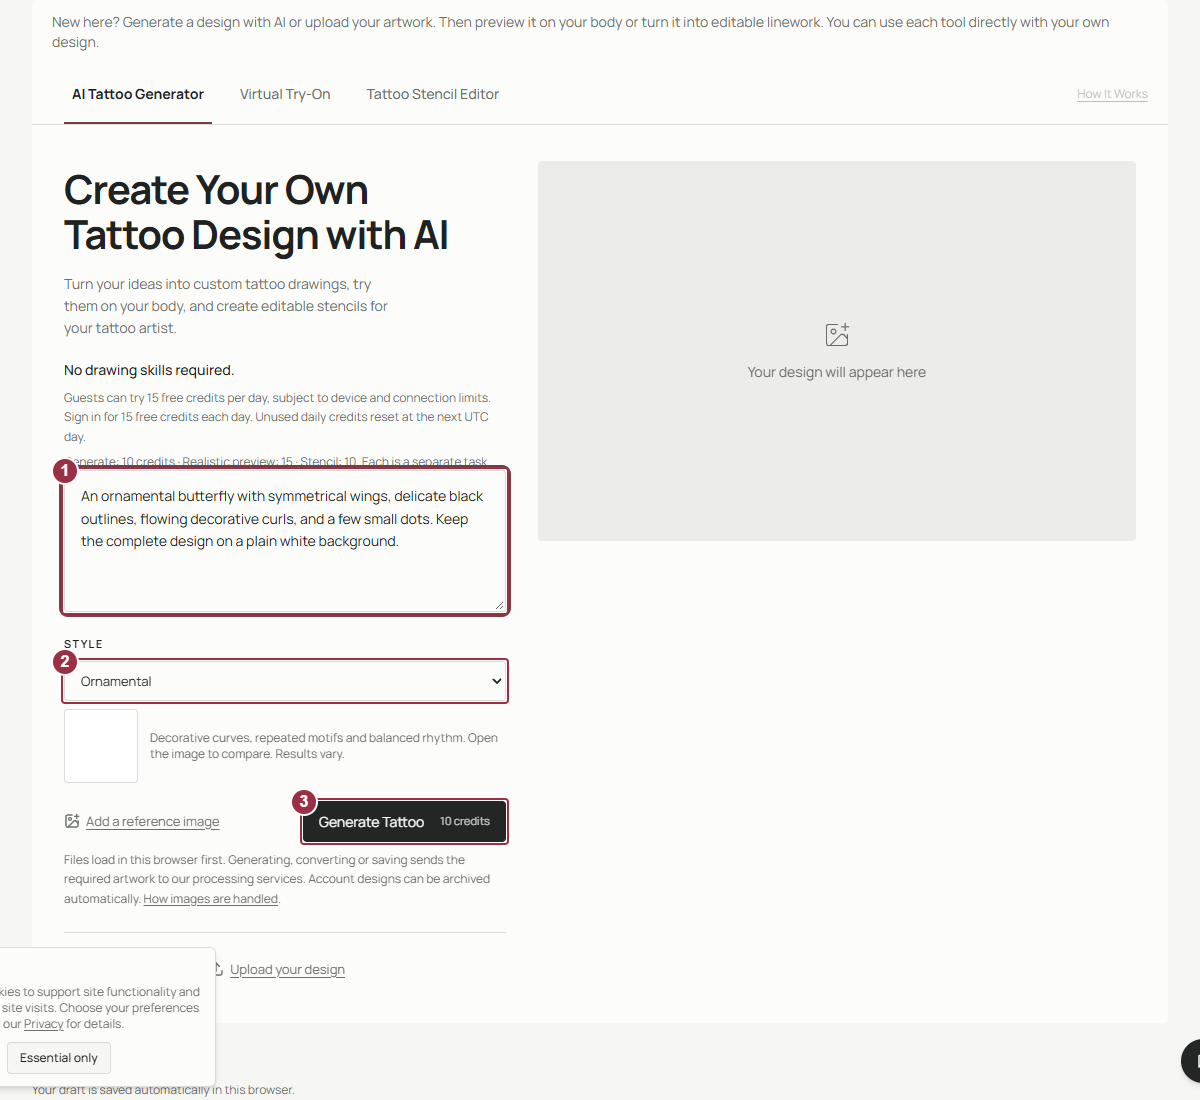
Enter a description, choose the visual direction, then create the design.
- Write the subject and details in the description box.
- Choose a style, or leave it on Choose for me.
- Select Generate Tattoo to generate the artwork.
Keep changes specific: ask for fewer details, wider spacing, a different color, or a simpler silhouette. If you already have a drawing, select Upload your design below the prompt to use that file directly for try-on or stencil creation.
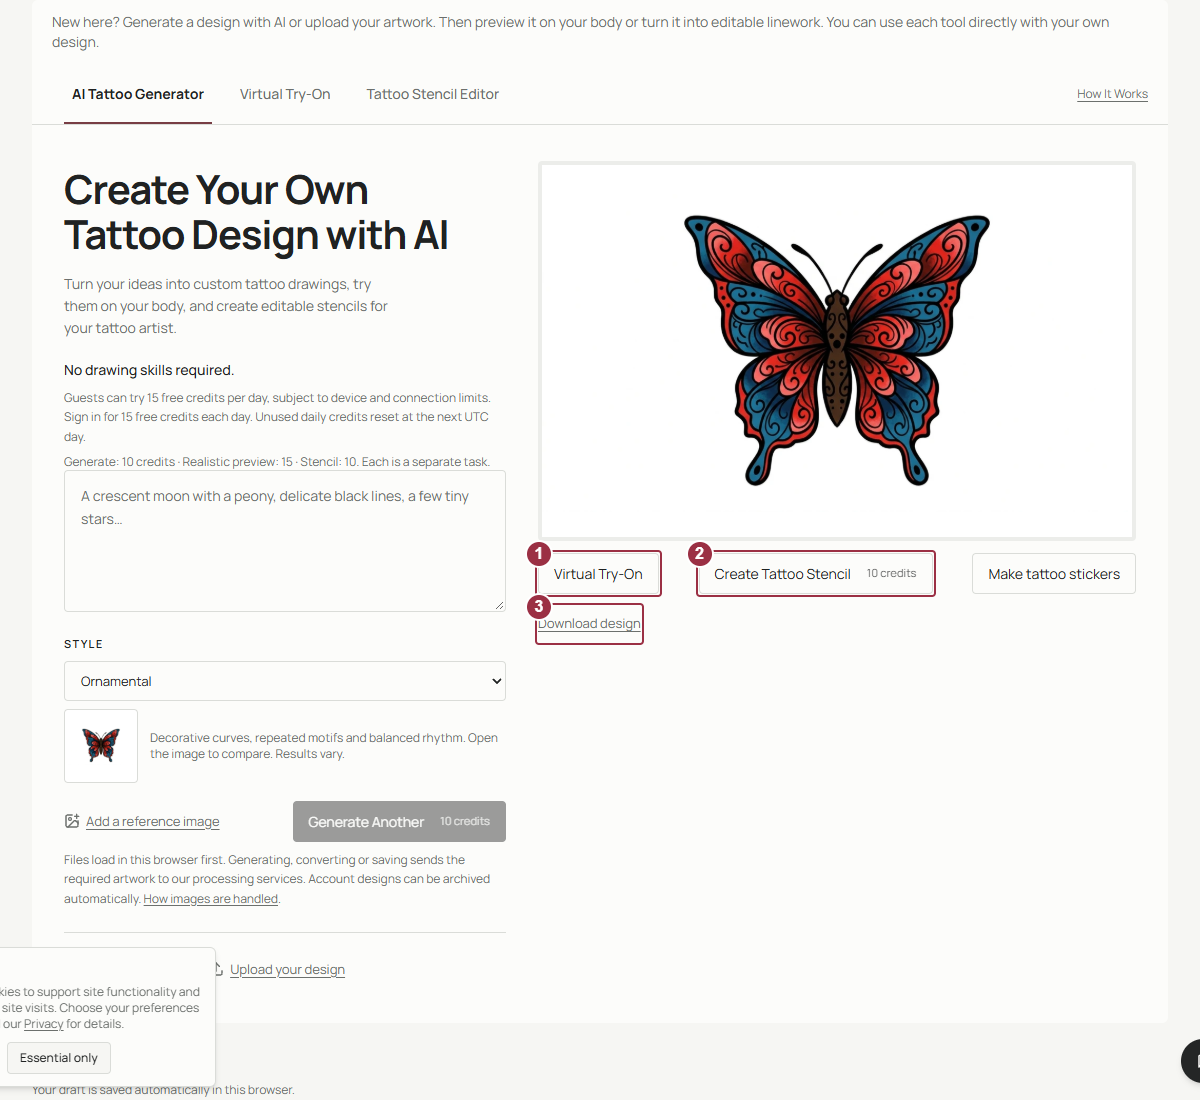
After a design is loaded, choose what to do next. This walkthrough uses an existing generated butterfly uploaded with Upload your design; it is an illustration of the workflow, not a guaranteed result of the sample prompt.
- Select Try on to explore placement.
- Select Create Tattoo Stencil to convert the original artwork into linework.
- Select Download design to keep the artwork as a PNG.
2. Try the tattoo on a model or your photo
Choose a body area
Select Try on beneath the artwork or open the Virtual Try-On tab. The model selector shows male and female bodies. Switch between Front and Back, then select the area where you want the tattoo. View Full-Body Model opens a whole-body view. To work with your own picture instead, select Upload your photo.
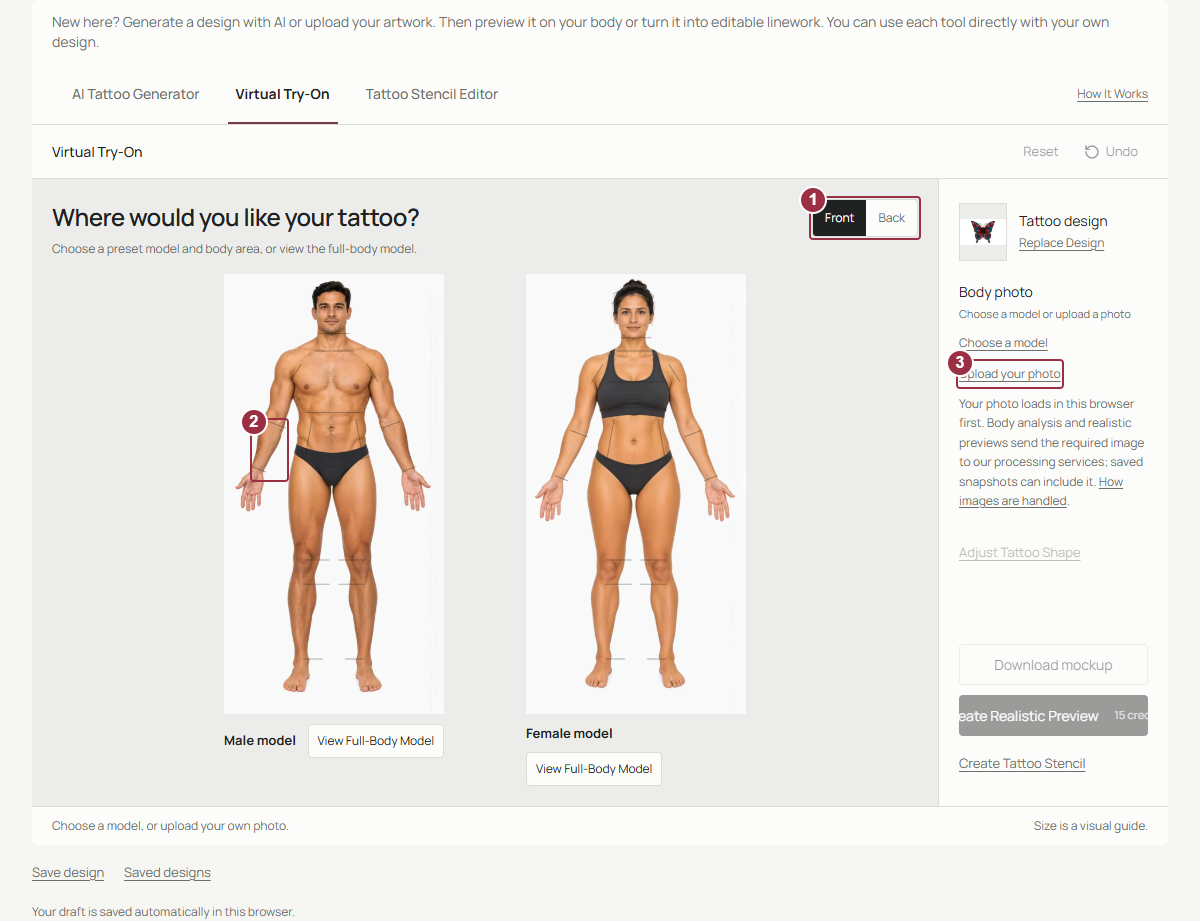
Choose the body view and area, or supply your own photo.
- Switch between Front and Back to see available areas.
- Select a body area, such as the male right forearm, to open a closer view.
- Select Upload your photo to replace the model with your own image.
Move, resize, and shape the tattoo
Drag the tattoo to move it. Use the resize and rotation handles to change its size and angle. Zoom in for detailed adjustments, drag the background to pan while zoomed in, and use Fit to view to see the whole photo again. Adjust Tattoo Shape reveals fit points for changing the outline to follow the visible surface.
Keep the tattoo on visible skin and check that it does not cross clothing or the edge of the photo. Use Choose a model or Back to models to compare another area. The try-on size is a visual guide; set the actual printed size later in the stencil settings.
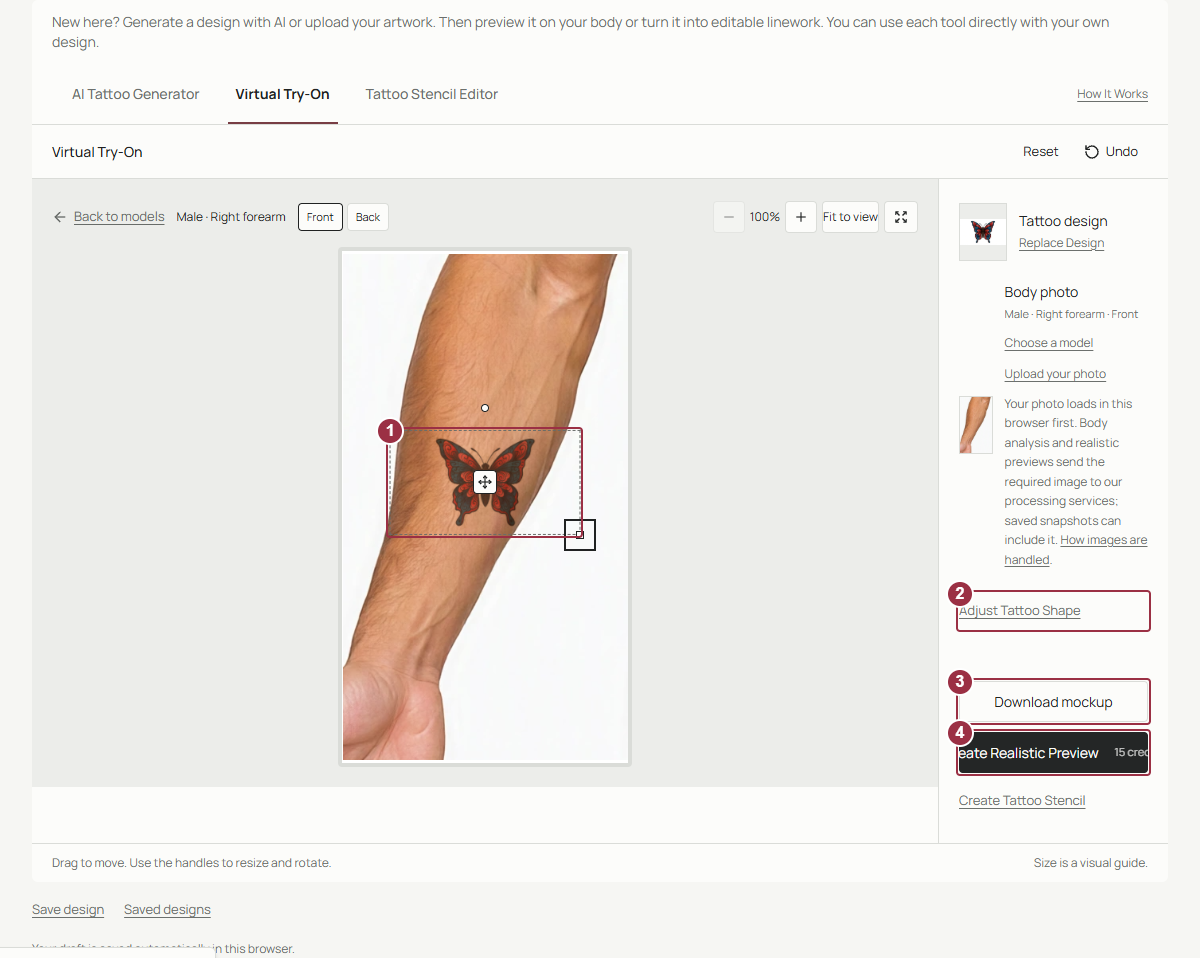
Position the tattoo before choosing a quick mockup or a blended preview.
- Drag the move handle or the tattoo to position it; use the other handles to resize and rotate.
- Open Adjust Tattoo Shape to change the fit points.
- Download mockup saves the current placement without running skin blending.
- Create Realistic Preview processes the placement into a more natural preview.
Download the placement or blend it with the skin
Download mockup saves the current photo and tattoo placement as a PNG. Select Create Realistic Preview when you want the application to process how the tattoo sits on the skin. When blending finishes, select Download preview to save that result. Adjust placement returns you to the positioning controls.
If blending reports a problem, check that the design sits inside a clear, visible skin area. Move it away from clothing and photo edges, or try a clearer photo. You can still download the unblended mockup. A preview helps compare ideas and communicate with your artist; it cannot show exactly how a finished tattoo will look.
3. Create a tattoo transfer stencil
Select Create Tattoo Stencil beneath the design or in the try-on controls. The application converts the original tattoo artwork into black-and-white linework and opens it in Tattoo Stencil Editor. The body photo is for placement; the stencil is prepared from the design.
Inspect and edit the linework
Use Select to choose a line. Its controls let you change Line width, open Edit line shape, or Delete line. When editing a line shape, select a point to use Split line here when available. Draw adds a new line, Remove stray marks clears small specks, and Undo reverses an edit. Check the cleaned result so that small details you meant to keep are still present.
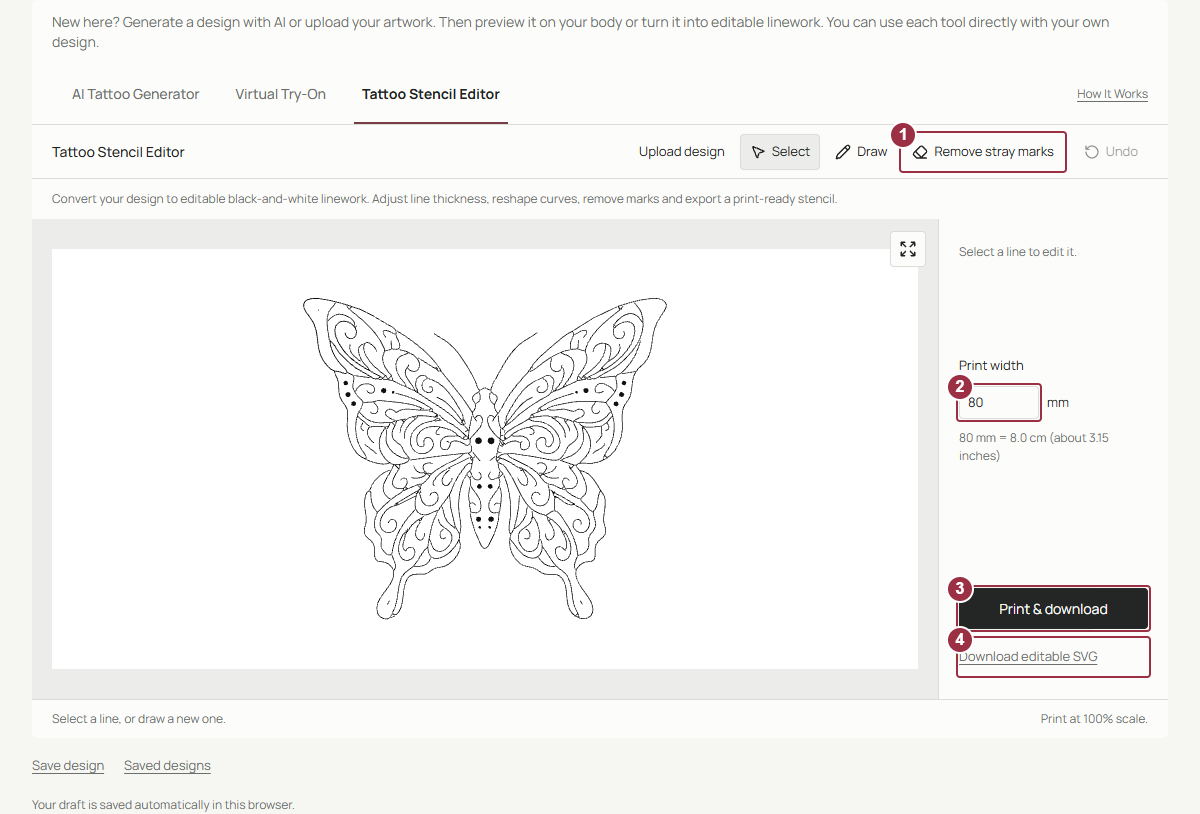
Refine the stencil and choose its physical size. The screenshot uses the matching, previously exported butterfly stencil.
- Remove stray marks helps clean tiny specks; review the result and use Undo if needed.
- Set Print width in millimeters.
- Open Print & download for the paper preview and PDF, PNG, or print options.
- Download editable SVG keeps the linework available for later editing.
Set the size and export for transfer printing
- Set the physical tattoo width. Enter a Print width in the editor, then open Print & download. Tattoo width (mm) in the dialog lets you adjust it again. The preview shows the resulting width and height. For example, 80 mm is an 8 cm wide design.
- Choose the paper. Select the paper that matches your printer. Open Layout options if you need orientation or multiple copies. If the design is larger than a sheet, check the sheet count and layout before exporting.
- Download or print. Download PDF keeps the paper layout. Download PNG exports one cropped stencil at 300 DPI. Print opens the printing workflow. Use actual size or 100% scale so the printer does not shrink the design to fit.
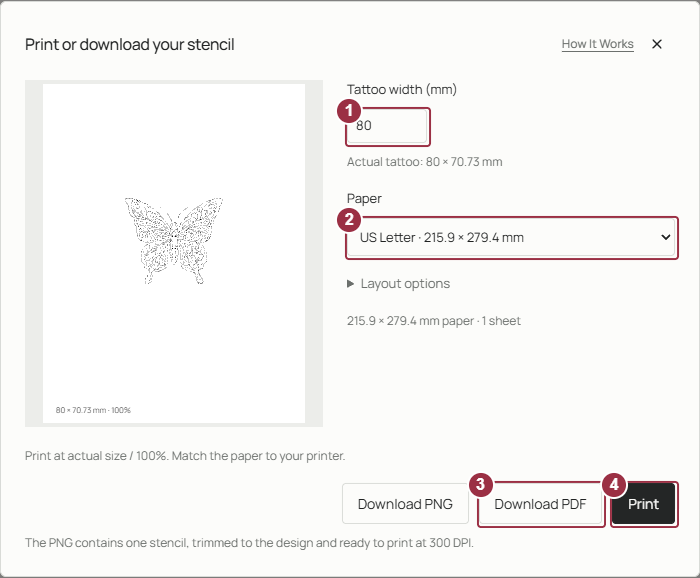
Confirm the physical dimensions and paper before exporting or printing.
- Enter Tattoo width (mm) and check the displayed dimensions.
- Choose the paper used by your printer.
- Download PDF saves the page layout for printing.
- Select Print and use actual size / 100% in the print settings.
For the physical transfer, use the exported stencil with a compatible tattoo stencil printer and the transfer paper it requires. Follow that printer and paper's instructions, including whether mirroring is needed. Confirm the direction of lettering or any asymmetrical motif before transferring. Check a test print's width with a ruler, and share the stencil with your artist for final line and placement adjustments.
Scroll horizontally to see all columns.
| File | Use it for | Where to get it |
|---|---|---|
| Design PNG | Keeping or sharing the original tattoo artwork | Create → Download design |
| Try-on PNG | Comparing or sharing placement on a model or photo | Try on → Download mockup or Download preview |
| Stencil PDF | Printing the stencil with the selected paper layout | Stencil editor → Print & download → Download PDF |
| Stencil PNG | A cropped raster stencil at the chosen width and 300 DPI | Stencil editor → Print & download → Download PNG |
| Editable SVG | Reopening vector linework in a compatible editor | Stencil editor → Download editable SVG |
If you need to edit the lines later, keep the SVG as well as your printable file. A transfer stencil is a black-and-white guide to the motif, rather than the original color illustration. SVG is a vector format; the W3C introduction to SVG explains how vector graphics describe shapes and paths.
Common questions
Can I use my own tattoo design?
Yes. In AI Tattoo Generator, select Upload your design and choose a PNG, JPEG, or WebP file. Once it appears in the preview, you can try it on or create a stencil without generating a new design.
What is the difference between Download mockup and Download preview?
Download mockup saves the placement you have arranged on the photo. Download preview appears after Create Realistic Preview has finished and saves the processed result. Both are images for visual comparison; neither sets the stencil's physical print dimensions.
Why is my printed stencil the wrong size?
Check Tattoo width (mm), confirm the paper selection, and turn off Fit to page or similar resizing in the print dialog. Print at actual size / 100%, then measure a test print. When printing a PNG in another application, make sure it uses the intended physical dimensions rather than automatically filling the page.
How do I keep my work for later?
The current draft is restored from this browser's storage. Signed-in generated designs and stencil versions can also be archived automatically in My designs; manual saved snapshots can include body photos and try-on results. Use Download design, Download mockup or Download preview, and the stencil export options to keep separate copies. Download editable SVG when you want to continue editing the vector lines in another compatible tool.
Ready to follow the steps? Open the studio and create your tattoo, or return to Tattoo Drawings guides.
Guides for your next task
Learn to create a custom design with AI, try a tattoo on your body or create a stencil from an image. For the next decision, prepare the stencil for printing, compare Fine Line and Blackwork or choose size and placement.